This is a tutorial aimed at systems and middleware administrators who are new to mailing techniques but know how to use VI, VIM or any other editor. This article will also interest experts and others interested in an easier way of mailing by using a basic system and without having to install extra packages or modules.
Shell and Perl have both been used for varying purposes in the field of systems administration. However, one cannot completely replace the other. So let’s look at how to send emails using Shell and Perl on UNIX/GNU Linux platforms. This is very useful while automating alerting or monitoring systems. If you know emailing in Shell, you will find it very easy to translate it in Perl. Both have almost the same lines of code in this article. What we achieve here using Shell and Perl should be equally possible with Ruby, Python or any scripting language that can make use of the existing mailing facilities in UNIX/GNU Linux.
For Perl, we will not use any mailing modules, though that is the most preferred method. This is just to make users aware that Perl can work well even without modules.
For Perl, we will not use any mailing modules, though that is the most preferred method. This is just to make users aware that Perl can work well even without modules.

Figure 1: Mail without attachment
Prerequisites
Prior to exploring Shell and Perl, let’s just go through the following checklist:
i) For UNIX or GNU Linux systems, you need Fedora or Ubuntu. I am using Fedora for our examples. So my install pattern will prefer yum to dpkg/apt.
ii) You need the Internet to reach the software repository to install packages. Though I said we wouldn’t be installing packages, this is just for our test environment. We cannot practice on a production environment, so it is necessary that we have a small server environment installed to see the mailing in action.
iii) Regarding the mail server, most companies that have Red Hat or Fedora Linux should have Sendmail configured, by default. Some might even have Postfix but the sendmail command is very common. The local sendmail command will take care of passing the mail onto the local MTA or mail transfer agent (either sendmail or postfix).
a. To keep things really simple, I am using:
Prior to exploring Shell and Perl, let’s just go through the following checklist:
i) For UNIX or GNU Linux systems, you need Fedora or Ubuntu. I am using Fedora for our examples. So my install pattern will prefer yum to dpkg/apt.
ii) You need the Internet to reach the software repository to install packages. Though I said we wouldn’t be installing packages, this is just for our test environment. We cannot practice on a production environment, so it is necessary that we have a small server environment installed to see the mailing in action.
iii) Regarding the mail server, most companies that have Red Hat or Fedora Linux should have Sendmail configured, by default. Some might even have Postfix but the sendmail command is very common. The local sendmail command will take care of passing the mail onto the local MTA or mail transfer agent (either sendmail or postfix).
a. To keep things really simple, I am using:
- Sendmail as an MTA
- Local UNIX services as an MDA (mail delivery agent)
- The local mbox as the mail delivery location
- The mail command as mail client
- System users for basic authentication and sending/receiving mail
b. You need to install Sendmail, as follows:
yum install sendmail-cfservice sendmail start |
c. VIM or VI Improved is a package that might make your work easier because of the benefit of syntax highlighting. It is very easy to get this package on GNU Linux. On UNIX platforms, we might have to use just the VI editor. (Please check the reference at the end of this article for VIM installations.)
iv) The following default mail clients can be used:
mailx/mailmuttOR sendmail -t |
The above three are the common, basic command line parameters used in UNIX or GNU Linux to send mails. We will be using the last one, sendmail, by piping commands to it. This is just to keep things simple and standardised, as we are looking at both UNIX and GNU Linux environments as well as very basic arguments, since all parameters might not be available in all the environments.
The modules normally used in Perl for SMTP are:
The modules normally used in Perl for SMTP are:
Net::SMTPMail::SendmailMIME::Lite (Most widely and commonly used) |

Figure 2: Mail with attachment
The procedure
We will avoid importing any Perl modules for actual mailing. Going through these methods, we should be able to learn how a mail is sent out. These are the four types of mails:
1. Clear text email
2. Clear text email with attachment
3. HTML email
4. HTML email with attachment (This is a combination of 2 and 3. Since it is a repetition, we will not actually do this as an example.)
In the examples that follow, do notice the portions that create new lines, in both Shell and Perl. If we miss the right number of new lines, the mail might not produce the desired results.
In Shell, by default, echo adds a new line. But in some cases, we need to give one more new line apart from the one Shell already outputs. Perl, by default, does not add a new line; so we have to specifically add the required number of new lines.
In the first case of a clear text email without attachment we might not notice much of a difference. The difference becomes apparent when we have to make more than one MIME addition. Adding files as attachments is one example of going in for MIME additions.
We will avoid importing any Perl modules for actual mailing. Going through these methods, we should be able to learn how a mail is sent out. These are the four types of mails:
1. Clear text email
2. Clear text email with attachment
3. HTML email
4. HTML email with attachment (This is a combination of 2 and 3. Since it is a repetition, we will not actually do this as an example.)
In the examples that follow, do notice the portions that create new lines, in both Shell and Perl. If we miss the right number of new lines, the mail might not produce the desired results.
In Shell, by default, echo adds a new line. But in some cases, we need to give one more new line apart from the one Shell already outputs. Perl, by default, does not add a new line; so we have to specifically add the required number of new lines.
In the first case of a clear text email without attachment we might not notice much of a difference. The difference becomes apparent when we have to make more than one MIME addition. Adding files as attachments is one example of going in for MIME additions.
Clear text email without an attachment
On Shell, use the following code:
On Shell, use the following code:
#!/bin/bashsubject="Shell Mail without attachment";from="osfyuser"; #can have complete mailing email idto="osfyedit"; # These are local mail usersbodyFile="mailbody.txt";cat > $bodyFile <<EOFThis is a text for all mailersWelcome to the world of mailing... Buhahaha!!EOF{echo "From: $from"echo "To: $to"echo "Subject: $subject"echo -e "Content-Type: text/plain; charset=us-ascii\n"cat $bodyFileecho} | /usr/sbin/sendmail –t |
i) As root, create two users, as shown below:
a. osfyuser
useradd osfyuser |
b. osfyedit
useradd osfyedit |
ii) Log in as osfyuser. Use the editor of your choice to save the above code as a file. Let us call it mailer.sh and make it executable (we’re using VIM), as follows:
a. chmod u+x mailer.sh |
iii) Run the executable file, as follows, so that it sends a text mail to the user osfyedit:
a. ./mailer.sh |
iv) A file gets created so as to represent the body
of the mail:
of the mail:
[osfyuser@osfymail ~]$ ls -l mailbody.txt-rw-rw-r-- 1 osfyuser osfyuser 76 Aug 31 19:05 mailbody.txt |
Open another terminal, log in as osfyedit user and type ‘mail’ to see if there are any mails.
On Perl, after saving the following code as a file in osfyuser, with the filename mailer.pl, repeat the procedures from iii) to v) given above, and compare the results. They should be exactly the same.
On Perl, after saving the following code as a file in osfyuser, with the filename mailer.pl, repeat the procedures from iii) to v) given above, and compare the results. They should be exactly the same.
#!/usr/local/bin/perlmy ($subject, $from, $to, $fh, $content);$subject = “Perl Mail without attachment”;$from = “osfyuser”;$to = “osfyedit”;$fh=”mailbody.txt”;open(FILE, “>”, “$fh”) or die “Cannot open $fh: $!”;print FILE “This is a text for all mailers\nWelcome to the world of mailing... Buhahaha!!”;close(FILE);open(MAIL, “|/usr/sbin/sendmail -t”);print MAIL “FROM: $from\n”;print MAIL “TO: $to\n”;print MAIL “Subject: $subject\n”;print MAIL “Content-Type: text/plain; charset=us-ascii\n\n”;open(FILE, “<”, “$fh”) or die “Cannot open $fh: $!”;print MAIL <FILE>;close(FILE);print MAIL “\n\n”;close(MAIL); |

Figure 3: Mail listing with browser mail client and IMAP mail service
Clear text email with an attachment
Normally, we use uuencode, the universal method of converting a file into understandable UNIX code that is decoded at the server end.
For Shell, use the following code:
Normally, we use uuencode, the universal method of converting a file into understandable UNIX code that is decoded at the server end.
For Shell, use the following code:
#!/bin/bashsubject="Shell Attachment";from="osfyuser";to="osfyedit";attachment="/home/osfyuser/test.txt"bodyFile="mailbody.txt";cat > $bodyFile <<EOFThis is a text for all mailersWelcome to the world of mailing... Buhahaha!!EOF{echo "From: $from"echo "To: $to"echo "Subject: $subject"echo "Content-Type: multipart/mixed; boundary=\"frontier\"";echo "--frontier"echo -e "Content-Type: text/plain; charset=us-ascii\n"cat $bodyFileechoecho "--frontier"echo -e "Content-Disposition: attachment; filename=`basename $attachment`"echo -e "Content-Type: text/plain; name=$attachment\n";cat $attachmentecho} | /usr/sbin/sendmail –t |
This time, we will have an extra line while checking for mail. The attachment, which is in plain text, will turn out as readable text in the destination mail box.
This is a squirrelmail client tool which is a browser based view of the mails sent from osfyuser on the command line to user osfyedit. I used Dovecot IMAP/POP to make the browser connect to a mailbox (see Figure 4).
For Perl, use the following code:
This is a squirrelmail client tool which is a browser based view of the mails sent from osfyuser on the command line to user osfyedit. I used Dovecot IMAP/POP to make the browser connect to a mailbox (see Figure 4).
For Perl, use the following code:
#!/bin/perlmy ($subject, $mach, $from, $to, $attachment, $fh, $content);$subject = “Test Mail”;$from = “osfyuser”;$to = “osfyedit”;$attachment=”/home/osfyuser/test.txt”;$fh=”mailbody.txt”;open(FILE, “>”, “$fh”) or die “Cannot open $fh: $!”;print FILE “This is a text for all mailers\nWelcome to the world of mailing... Buhahaha!!”;close(FILE);open(MAIL, “|/usr/sbin/sendmail -t”);print MAIL “FROM: $from\n”;print MAIL “TO: $to\n”;print MAIL “Subject: $subject\n”;print MAIL “Content-Type: multipart/mixed; boundary=frontier\n”;print MAIL “--frontier\n”;print MAIL “Content-Type: text/plain; charset=us-ascii\n\n”;open(FILE, “<”, “$fh”) or die “Cannot open $fh: $!”;print MAIL <FILE>;close(FILE);print MAIL “\n\n”;print MAIL “--frontier\n”;chomp(my $basename=`basename $attachment`);print MAIL “Content-Disposition: attachment; filename=$basename\n”;print MAIL “Content-Type: text/plain; name=$attachment\n\n”;open(FILE, “<”, “$attachment”) or die “Cannot open $attachment: $!”;print MAIL <FILE>;print MAIL “\n”;close(FILE);close(MAIL); |
For sending .pdf, .zip or .doc or .xlsx files, we need to use:
i) uuencode or base64 for Shell
ii) base64 and the IO::File module for Perl
The following are only small snippets we can adjust/add to the code provided earlier.
For Shell, the snippet is:
i) uuencode or base64 for Shell
ii) base64 and the IO::File module for Perl
The following are only small snippets we can adjust/add to the code provided earlier.
For Shell, the snippet is:
echo “Content-Transfer-Encoding: uuencode”#echo “Content-Transfer-Encoding: base64”echo -e “Content-Disposition: attachment; filename=`basename $attachment`”echo -e “Content-Type: application/octet-stream; name=$attachment\n”;uuencode $attachment `basename $attachment`#base64 $attachment |
For Perl, the snippet is:
#print MAIL “Content-Transfer-Encoding: base64\n”;#print MAIL “Content-Transfer-Encoding: uuencode\n”;print MAIL “Content-Disposition: attachment; filename=$basename\n”;print MAIL “Content-Type: application/octet-stream; name=$attachment\n\n”;# print MAIL read_file($attachment); # Can be also used for text/plain attachmentsprint MAIL encode_base64( read_file($attachment) ); # CTE must be 64; this must be accompanied by the MIME::Base64 module which provides this function for encoding. It comes default on all Perl installs.#print MAIL `base64 $attachment`; # CTE must be 64; this procedure is incase you do not want to use the above module. Using the Shell command ticks.#print MAIL `uuencode $attachment $basename`; # CTE must be uuencode; this also uses the Shell command ticks to use uuencode instead of base64 |
The following function is required for Perl to read the file properly, only if we use the encode_base64 function from the MIME::Base64 module. We could also use this function for plain text as in a commented portion in the code earlier.
sub read_file{my $filename = shift @_;my $attach = new IO::File;$attach->open(“< $filename”)or die “Error opening $filename for reading - $!\n”;$attach->binmode;local $/;<$attach>} |
Ensure that you use the right command for the right content transfer encoding. Whichever line comes before theuuencode or base64 command, it must have two new lines before it, to process the mail properly. In Shell, by default,echo comes with a new line. Adding ‘-e’ option and ‘\n’ would make that two new lines.
The Content Type can be figured out using the file command in Linux. But in other UNIX platforms, the file command doesn’t have that feature. Keeping it as ‘octet-stream’ handles any kind of file. By default, when we attach any file, the normal mail command takes the default as octet-stream, except for plain text files.
The Content Type can be figured out using the file command in Linux. But in other UNIX platforms, the file command doesn’t have that feature. Keeping it as ‘octet-stream’ handles any kind of file. By default, when we attach any file, the normal mail command takes the default as octet-stream, except for plain text files.

Figure 4: Mail without attachment read with browser mail client
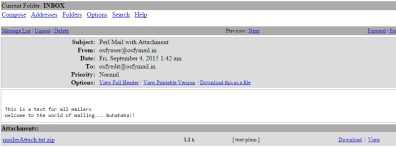
Figure 5: Mail with attachment seen with browser mail client
HTML email
We have so far handled only plain text mails. And if we receive text mails in Outlook or any other mail client, when we try to reply, it (by default) sticks to the non-HTML environment in which it was initially received. Only in HTML format can we highlight or beautify the text if we need to forward a text mail to someone. To do that, we have to manually change the property of the mail from text to HTML. Instead, we can also make the machine send an HTML mail rather than a text mail.
We can also add different kinds of HTML entries, like tables, URLs or any form of coloured mail, even using style sheets. The presentation always matters.
The following code will send HTML mails. I’m not covering HTML with attachments. If you want to add attachments, the earlier attachment methods could be used (plain text or application/octet-stream and encoding standards to be base64 or normal 7-bit).
For Shell, the code is:
We have so far handled only plain text mails. And if we receive text mails in Outlook or any other mail client, when we try to reply, it (by default) sticks to the non-HTML environment in which it was initially received. Only in HTML format can we highlight or beautify the text if we need to forward a text mail to someone. To do that, we have to manually change the property of the mail from text to HTML. Instead, we can also make the machine send an HTML mail rather than a text mail.
We can also add different kinds of HTML entries, like tables, URLs or any form of coloured mail, even using style sheets. The presentation always matters.
The following code will send HTML mails. I’m not covering HTML with attachments. If you want to add attachments, the earlier attachment methods could be used (plain text or application/octet-stream and encoding standards to be base64 or normal 7-bit).
For Shell, the code is:
#!/bin/bashsubject=”Bash HTML”;from=”osfyuser”;to=”osfyedit”;url=’http://localhost/css/mail.css’;#css=’location/to/css/file’ # If we are using a local stylesheet,then `cat $css` into the bodycss=’mail.css’ # If we are using a local file, then cat $css into the body`wget -qO- $url > $css`;bodyFile=”mailbody.html”;cat > $bodyFile <<EOF<!doctype html public “-//w3c//dtd html 4.0 transitional//en”><html><head><style>`cat $css`</style></head><p>this is test mail<br><table id=’mail’><tr><th>Month</th><th>Savings</th></tr><tr><td>January</td><td>\$100</td></tr><tr class=’alt’><td>February</td><td>\$500</td></tr></table></html>EOF{echo “From: $from”echo “To: $to”echo “Subject: $subject”echo -e “Content-Type: text/html; charset=us-ascii\n”;cat $bodyFileecho} | /usr/sbin/sendmail -t |
For Perl, the code is:
#!/usr/local/bin/perluse LWP::Simple qw(get);my ($url, @css, $subject, $from, $to, $fh, $content);$subject = “Perl HTML”;$from=”osfyuser”;$to=”osfyedit”;$fh=”mailbody.html”;$url = ‘http://localhost/css/mail.css’; @css = get $url;#@css=`cat $css`;my $message=<<”EOF”;<!doctype html public “-//w3c//dtd html 4.0 transitional//en”>\n<html>\n\n<head>\n<style>\n@css</style></head>\n\n<p>this is test mail\n\n<table id=’mail’>\n<tr>\n<th>Month</th>\n<th>Savings</th></tr>\n<tr>\n<td>January</td>\n<td>\$100</td></tr>\n<tr class=’alt’>\n<td>February</td>\n<td>\$500</td></tr></table>\n</html>\nEOFopen(FILE, “>”, “$fh”) or die “Cannot open $fh: $!”;print FILE $message;close(FILE);open(FILE, “<”, “$fh”) or die “Cannot open $fh: $!”;open(MAIL, “|/usr/sbin/sendmail -t”);print MAIL “FROM: $from\n”;print MAIL “TO: $to\n”;print MAIL “Subject: $subject\n”;print MAIL “Content-Type: text/html; charset=us-ascii\n”;print MAIL <FILE>;close(FILE);close(MAIL); |

Figure 6: Attachment opened from the browser using Zip utility
Emailing via PHP is well explained in the following URL for all the above three cases, though it does not include style sheets: http://webcheatsheet.com/php/send_email_text_html_attachment.php

Figure 7: Mail with HTML contrary to normal text
Note: There are two major differences between PHP and Shell/Perl when it comes to effective emailing:
i) PHP is itself embedded HTML, while in Perl we have to separately embed to make it HTML.
ii) PHP has a built-in mail function, which does a major chunk of the mailing. We could very well write a Perl module or Shell function file that we could reuse or call in programs. I prefer a Perl module because of the level of intricacies that can be included to make it a perfect function; and then we can use it within a Shell program too.
i) PHP is itself embedded HTML, while in Perl we have to separately embed to make it HTML.
ii) PHP has a built-in mail function, which does a major chunk of the mailing. We could very well write a Perl module or Shell function file that we could reuse or call in programs. I prefer a Perl module because of the level of intricacies that can be included to make it a perfect function; and then we can use it within a Shell program too.
References
[1] https://en.wikipedia.org/wiki/MIME
[2] http://www.perlmonks.org/?node_id=675595 à Net::SMTP
[3] http://perldoc.perl.org/MIME/Base64.html
[4] http://search.cpan.org/~mivkovic/Mail-Sendmail-0.79/Sendmail.pm
[5] http://search.cpan.org/~rjbs/MIME-Lite-3.030/lib/MIME/Lite.pm
[6] http://www.if-not-true-then-false.com/2012/vi-vim-syntax-highlighting-on-fedora-centos-red-hat-rhel/
[7] http://www.vim.org/download.php
[8] http://perl.plover.com/local.html
[1] https://en.wikipedia.org/wiki/MIME
[2] http://www.perlmonks.org/?node_id=675595 à Net::SMTP
[3] http://perldoc.perl.org/MIME/Base64.html
[4] http://search.cpan.org/~mivkovic/Mail-Sendmail-0.79/Sendmail.pm
[5] http://search.cpan.org/~rjbs/MIME-Lite-3.030/lib/MIME/Lite.pm
[6] http://www.if-not-true-then-false.com/2012/vi-vim-syntax-highlighting-on-fedora-centos-red-hat-rhel/
[7] http://www.vim.org/download.php
[8] http://perl.plover.com/local.html


